Welcome to the comprehensive bonsai enthusiast guide, where you’ll embark on a journey towards bonsai repotting mastery. If you cherish the ancient art of bonsai care, you know that repotting is a pivotal part of the process, one that breathes new life into your miniature trees. In this guide, you’ll discover intricate repotting techniques that ensure the health, vitality, and aesthetic grace of your bonsai. Your path to becoming a deft practitioner of bonsai repotting begins here.
Mastering the subtleties of bonsai repotting not only deepens your understanding of this living art form, but also fortifies the connection between you and your bonsai. You’re about to enhance your expertise with knowledge accumulated from bonsai masters across generations, tailored for you, the dedicated bonsai caretaker.
Key Takeaways
- Understand the critical role that repotting plays in sustaining your bonsai’s health and beauty.
- Learn essential bonsai care practices to perform repotting with confidence and skill.
- Discover the repotting techniques that will help your bonsai thrive for years to come.
- Value the significance of timing and precision when executing a successful bonsai repot.
- Gain insight into the specialized tools and approaches needed for proper bonsai maintenance.
- Embrace repotting as a core aspect of the bonsai enthusiast’s guide to tree care.
Understanding the Importance of Bonsai Repotting
Embarking on the journey of bonsai cultivation brings with it the need for understanding critical care practices that ensure the longevity and beauty of your miniature trees. Central to these practices is the art of bonsai repotting—a process vital for the ongoing health of the plant. With guidance from authorities like the BCI Bonsai, American Bonsai Society, and Golden State Bonsai Federation, you are poised to unravel the nuances of bonsai transplant significance, recognizing repotting signs, and the myriad perks of bonsai repotting.
Signs Your Bonsai Needs a New Home
Recognizing when your bonsai needs repotting is fundamental to preventive care. Symptoms such as roots circling the bottom of the pot, slow growth, or water that runs straight through the soil without being absorbed are telltale signs that your bonsai yearns for a new abode. It’s essential to be alert to these signals to avoid root-bound stress and to maintain the ecosystem necessary for your bonsai’s prosperity.
The Benefits of Regular Repotting
Not only does repotting prevent the detrimental effects of being root-bound, but it also infuses your bonsai with fresh nutrients and the space needed for roots to expand healthily. This periodic rejuvenation is key for enhanced root growth, efficient nutrient uptake, and ultimately, a more vibrant and robust bonsai.
| Indicator | Consequence if Ignored | Action to Take |
|---|---|---|
| Roots Circling the Pot | Restricted growth, poor nutrient uptake | Repot to a larger container |
| Soil Dries Out Rapidly | Potential dehydration and stress | Refresh soil mix to improve moisture retention |
| Sluggish Growth | Stunted development, diminished vigor | Trim roots and repot to renew growth cycle |
Heeding these insights about bonsai repotting will gift you not only with a flourishing plant but an intimate and rewarding connection to the rhythm of its life cycle.
The Ideal Time to Repot Your Bonsai
Choosing the perfect moment for repotting your bonsai is more art than science. It calls for a blend of keen observation and understanding of your bonsai’s unique lifecycle. Bonsai Empire, along with seasoned professionals, stress that recognizing the best time for bonsai repotting is essential for your miniature tree’s continued health and vigor.

Seasonal Considerations for Bonsai Repotting
Seasonal change is a compass that guides the timing for bonsai care, and repotting is no exception. Seasonal repotting tips vary depending on the type of bonsai you have, but a rule of thumb is to repot when your tree is poised to grow most vigorously. This is typically in the spring, just as buds begin to swell. Let’s break it down by species and seasons:
| Bonsai Species | Best Repotting Season | Key Considerations |
|---|---|---|
| Deciduous Trees | Early Spring | Avoid repotting when leaves are unfurling to prevent damaging tender new growth. |
| Coniferous Trees | Late Winter | Conifers are less susceptible to cold; repotting before spring warmth can stimulate root growth. |
| Tropical Trees | Mid-Spring to Early Summer | These species prefer stable warm temperatures, making late spring a safe repotting period. |
| Flowering Bonsai | Late Spring (after blooming) | Allowing the bonsai to flower before repotting ensures you don’t cut off buds accidentally. |
How to Tell If It’s Time for Repotting
While seasonal cues are critical, the signs that your bonsai itself displays cannot be ignored. Recognizing repotting timing can be the difference between a thriving bonsai and one that struggles to survive. Consider repotting your bonsai if you notice the following:
- Overgrown Roots: Roots appearing above the soil surface or growing out of the drainage holes are clear indicators.
- Slow Growth: A reduction in the growth rate of your bonsai can signal that it’s time for a fresh pot with more nutrients.
- Water Issues: Water that runs straight through the pot, indicating compacted and suffocated roots, calls for immediate repotting.
- Declining Health: Yellowing leaves or a general lack of vigor could be due to exhausted soil. Repotting gives your bonsai a fresh start.
Horticultural therapy studies have found that timing your bonsai’s repotting correctly has therapeutic benefits for the plant and the caregiver, promoting a bond and understanding of life’s natural rhythms. Trust your instincts but verify with expert advice to ensure that your bonsai receives the best care possible in its repotting journey.
Selecting the Right Pot for Your Bonsai
Choosing bonsai pots is more than just a matter of aesthetics; it is an essential step in sustaining the health and balance of your bonsai. Renowned ceramists and seasoned practitioners are unanimous in their view that bonsai pot selection must be approached with a blend of artistic consideration and horticultural expertise.
In your pursuit of suitable bonsai containers, let’s delve into the characteristics to consider:
- Size: Ensure the pot is proportionate to your bonsai for optimal growth and visual harmony.
- Shape: Match the pot’s shape with the bonsai style to accentuate its features.
- Material: Choose from clay, ceramic, or plastic, each affecting temperature and moisture regulation differently.
- Drainage: Good drainage is crucial in preventing root rot and other water-related issues.
With insights from bonsai pottery workshops, we’ve created a comparison chart to aid in your selection:
| Material | Advantages | Disadvantages | Suitability |
|---|---|---|---|
| Ceramic | Durable, frost-resistant, wide range of designs | Can be heavy and more expensive | Formal styles, premium displays |
| Clay | Excellent breathability, traditional appearance | Prone to cracking in cold climates | Classic styles, outdoor bonsai |
| Plastic | Lightweight, inexpensive, good for beginners | Less durable, may not support larger trees well | Training pots, casual practice |
When choosing bonsai pots, consider these suggestions from experienced ceramists:
“Select a pot that complements your bonsai’s color and form. It should serve as a frame that showcases the beauty of the tree without overpowering it.”
Lastly, remember that the principles of aesthetic design in bonsai are guidelines, not rules. Ultimately, the pot you choose should resonate with your personal taste and the unique character of your bonsai.
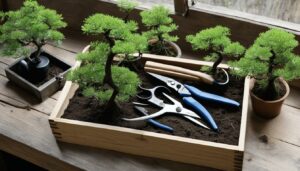
Essential Tools for Bonsai Repotting
As a devoted bonsai enthusiast, one of the most thrilling aspects of care is repotting your miniature masterpiece. The key to a successful repotting lies within the tools you utilize, each one designed to ensure precision and care for your living art. By equipping yourself with bonsai repotting tools specifically crafted for this delicate task, you’re setting the stage for your bonsai to thrive. Let’s discuss assembling a repotting kit that caters to all your bonsai’s needs.
Creating Your Bonsai Repotting Toolkit
Assembling a repotting kit is a foundational step in the intricate process of bonsai care. Quality tools can make all the difference, providing accuracy and minimizing the stress placed on your bonsai during the repotting process. Consider the following essential bonsai repotting tools:
- Bonsai Shears: For precisely trimming roots and foliage.
- Root Rakes: To gently detangle roots without causing damage.
- Soil Scoops: For transferring and placing soil with ease.
- Wire Cutters: Essential for shaping and securing bonsai branches.
- Chopsticks: An indispensable tool for tamping down soil around the roots.
With these select tools, your toolkit will be robust and versatile, ready to tackle any repotting challenge.
Sanitation Practices for Bonsai Tools
The vitality of your bonsai isn’t just in the careful repotting, but also in ensuring that the tools you use are clean and sanitized. Bonsai tool sanitation is critical in preventing the spread of disease and pests that can harm your precious tree. Follow these best practices:
- Regularly clean tools with soapy water, removing any soil and plant debris.
- Disinfect blades with alcohol or a bleach solution after each use.
- Dry tools thoroughly to prevent rust and corrosion.
- Store in a clean, dry place to maintain their condition.
Adhering to these sanitation steps will not only prolong the life of your tools but also protect the health of your bonsai.
| Tool | Use | Cleaning Method | Sanitization Frequency |
|---|---|---|---|
| Bonsai Shears | Trimming | Soapy water, dry cloth | After each use |
| Root Rakes | Detangling roots | Soapy water rinse | After each use |
| Soil Scoops | Transferring soil | Water rinse, air dry | Periodically |
| Wire Cutters | Shaping branches | Clean with brush, wipe | After each use |
| Chopsticks | Tamping soil | Water rinse | After each repotting |

Preparations Before the Bonsai Transplant
Bonsai transplant prep is critical for ensuring a successful repotting experience. As you begin preparing for bonsai repotting, consider the following pre-repotting steps to set the stage for a thriving bonsai:
- Select the right soil mix based on your bonsai type.
- Water your bonsai thoroughly a day before repotting to reduce stress.
- Gather all the tools you’ll need for the process.
Properly preparing for bonsai repotting involves understanding the specific needs of your bonsai to ensure the right conditions for its new environment.
| Preparation Step | Reason | Tips |
|---|---|---|
| Soil Moisture Check | To ensure easy removal and reduce root damage. | Water your bonsai until water runs clear from the drainage holes. |
| Tool Sanitation | Prevents the spread of disease during repotting. | Clean and sterilize your tools with alcohol or a bleach solution. |
| Root Pruning Preparation | Encourages new growth and maintains bonsai size. | Be ready with sharp shears for a clean cut to avoid harming the tree. |
As you progress through the pre-repotting steps, remember that taking your time and being gentle with your bonsai will lead to a more successful transplant.
Don’t forget to consider the season and your bonsai species’ unique requirements when timing your repotting—it can make all the difference in your bonsai’s adaptation and growth post-transplant.
Step-by-Step Guide to Repotting Your Bonsai
Embarking on bonsai repotting requires meticulous preparation and gentle execution. This straightforward guide ensures you cover all the necessary steps, providing your bonsai with the perfect environment for continued growth and thriving health.

Removing the Bonsai from Its Old Pot
Start by carefully removing your bonsai from its current pot. Watering your bonsai a day ahead can make this process smoother. Gently loosen the edges of the soil from the pot with a repotting tool, ease the tree out, and evaluate the rootball.
Cleaning and Trimming Roots
Bonsai root trimming is essential for the reduction of encircled roots and to foster new growth. Rinse the roots lightly to remove excess soil, untangle them softly, and use sharp, clean shears to trim away any long or dead roots.
Layering Techniques for Bonsai Soil
Soil layering for bonsai is pivotal in managing drainage and aeration. Begin with a layer of coarse soil followed by a mixture of akadama, pumice, and lava rock for optimal root health. Ensure even coverage and firm placement without compacting the soil excessively.
| Layer | Purpose | Material Suggestion |
|---|---|---|
| Bottom | Drainage | Gravel or coarse soil |
| Middle | Root Support | Akadama |
| Top | Moisture Retention | Organic compost mix |
Bonsai Soil: Choices and Considerations
When it comes to cultivating a healthy and aesthetically pleasing bonsai, selecting the right bonsai soil mix plays a pivotal role. Contrary to common garden soil, bonsai soil is a blend of various components tailored to encourage optimum growth and ensure the health of these miniature trees. Let’s delve into the key considerations for bonsai soil selection and its crucial role in sustaining bonsai life.
Components of Bonsai Soil Mixes
Understanding the components of bonsai soil mixes is essential for any bonsai enthusiast. These mixes usually comprise three primary ingredients – akadama, pumice, and lava rock – each serving a specific function:
- Akadama: A type of clay granule that retains water and nutrients well, providing a moisture-rich environment for roots.
- Pumice: This lightweight volcanic rock helps to aerate the soil, improving drainage and root growth.
- Lava Rock: Known for its porous nature, lava rock aids in soil structure, preventing compaction and ensuring proper root health.
Often, additional organic materials such as pine bark can be mixed in to augment the soil’s structure and water retention abilities.
The Role of Soil in Bonsai Health
The soil in your bonsai pot assumes an integral part in the overall well-being of your tree. It is the primary supporter for your bonsai’s root system, the measure of water and nutrients it will hold, how it drains, and how well it facilitates root growth and development. Here’s a snapshot of why soil choice is critical for bonsai health:
- Soil determines water retention, ensuring your bonsai does not dry out or become over-watered.
- Proper soil mixture supports nutrient uptake, which is essential for the growth and vigor of your tree.
- A well-structured soil facilitates air flow to the roots, essential for the prevention of root rot and other common ailments.
Selecting the right bonsai soil mix is not only about nurturing a healthy bonsai but also about a profound connection to the art of bonsai care. With the right knowledge of bonsai soil mix components and their contributions to bonsai soil health, your bonsai will thrive, providing you with a living work of art that can be cherished for years to come.
Root Care During Bonsai Repotting
When it comes to bonsai root care, meticulous attention during the repotting process is critical for the continued health and growth of your miniature tree. Repotting root maintenance means not only providing your bonsai with a fresh environment but also ensuring that each step contributes to optimal bonsai root health. One of the paramount procedures is root pruning—a method hailed by bonsai masters as both an art and a science.

Root pruning should be approached with care, as over-pruning can hurt your bonsai. Pruning’s primary purpose is to remove old soil from the roots, encourage the growth of new feeder roots, and maintain a size that’s proportional to the planter. After pruning, treating the roots gently and providing the right conditions for healing are crucial for a strong recovery.
| Practice | Benefit |
|---|---|
| Gentle root pruning | Promotes the growth of new feeder roots |
| Ensuring proper hygiene | Prevents disease and promotes strong root systems |
| After-care with suitable soil | Encourages root healing and regrowth |
Additionally, plant physiology experts have pointed out the importance of timing in root maintenance. The best time for repotting is generally when the bonsai is at its strongest—often in early spring before the growth season begins. This timing allows the roots to heal without the added stress of supporting new foliage.
After repotting, root healing practices are the next step in ensuring vigorous growth. Your bonsai should be kept in a sheltered location, out of harsh sunlight, with optimal moisture levels. These conditions support the formation of new roots and acclimatization to the new pot. Remember, patience is key; your bonsai will take time to adjust to the changes and regrow its delicate roots.
Watering After Repotting: Ensuring Proper Hydration
Once you’ve completed the delicate process of repotting your bonsai, the focus must shift to providing the right amount of hydration to support its recovery. Watering bonsai post-repotting is a critical step, as it helps to settle the soil and eliminate air pockets around the roots. A sound hydration strategy is crucial to reinvigorate your bonsai and to encourage new root growth in its refreshed environment.
The First Watering Post-Transplant
Your bonsai’s first watering after repotting is perhaps the most important. Begin by using a gentle stream of water to soak the soil thoroughly. Continue watering until you see water freely draining from the bottom of the pot, ensuring that the entire root mass is moistened. This initial saturation helps the roots to make contact with the new soil, which is vital for hydration for bonsai as they recover.
Mindful watering after the first hydration is equally essential. Observe your bonsai’s soil daily; it should remain slightly damp, but not soggy. The top layer of soil can tell you a lot—if it feels dry to the touch, it’s probably time to water again. However, resist the temptation to water on a rigid schedule. Instead, respond to the tree’s needs, which can change based on environmental factors and the tree’s recovery rate.
Adjusting Watering Schedules After Repotting
After your bonsai has been repotted, its watering needs may differ from before. The bonsai watering schedule needs to be adapted to account for factors such as the new soil’s water retention properties, the season, and the tree’s stress recovery. Always allow the soil to approach dryness between waterings, which encourages the roots to grow in search of moisture. However, be vigilant not to let the soil completely dry out to avoid drought stress.
Developing an eye for your bonsai’s hydration needs comes with experience. Pay attention to the foliage for signs of dehydration or overwatering, which can include wilting leaves or a general appearance of listlessness. With careful observation and a responsive watering routine, your bonsai will thrive in its new home, setting the stage for years of growth and enjoyment.
Fertilization Strategies Post Bonsai Repotting
After you’ve taken the time to repot your bonsai, establishing an effective bonsai feed plan is crucial for its recovery and growth. The period following repotting is pivotal—you want to encourage your bonsai to develop new roots and acclimate to its new environment without causing nutrient burn or shock due to over-fertilization. Here, we’ll explore how to balance bonsai fertilization and the use of post-repotting fertilizers to ensure the health and vigor of your miniature tree.

Once your bonsai is snug in its new pot, the question of when to commence fertilization is paramount. Bonsai experts suggest waiting for a month before introducing any post-repotting fertilizers. This initial pause allows your bonsai to settle, and the timing aligns with the emergence of new roots that can absorb and benefit from the additional nutrients.
The choice between organic and synthetic fertilizers is another consideration. Organic fertilizers are often favored for their slow-releasing properties and lesser risk of root burn. They also support soil health by encouraging microbial activity, which, in turn, aids the bonsai’s root system. In contrast, synthetic fertilizers can offer a more immediate supply of nutrients, but they require careful application to prevent damage to the delicate new roots.
Remember, the goal of fertilization after repotting is to support your bonsai tree as it reestablishes its root system, not to boost rapid top growth immediately.
An optimal bonsai feed plan should be balanced and tailored to your specific tree species and environment. Below is a table that offers a comparative look at the characteristics of common fertilizer types post-repotting.
| Fertilizer Type | Nutrient Release Rate | Application Frequency | Suitable for Following Tree Types |
|---|---|---|---|
| Organic | Slow | Every 4-6 weeks | Most Bonsai Species |
| Synthetic (Liquid) | Fast | Every 2 weeks (Diluted) | Tropical and Subtropical Species |
| Synthetic (Granular) | Controlled | Every 1-3 months | Dormant or Slow-Growing Species |
To encourage a progressive and successful recovery, ensure you monitor the condition of your bonsai closely. Over time, as you become attuned to its needs, your bonsai’s response to the fertilization schedule will guide any necessary adjustments. With patience and care, your bonsai will flourish, showcasing the rewards of your dedicated post-repotting efforts.
Avoiding Common Mistakes in Bonsai Repotting
As a bonsai enthusiast, your journey includes mastering the delicate art of repotting. An essential aspect of this process is recognizing and steering clear of common bonsai repotting errors. Overpotting or underpotting your precious bonsai can lead to adverse impacts on its health. Additionally, the importance of avoiding root shock cannot be overstated.
Overpotting and Underpotting Concerns
Overpotting, or selecting a pot that’s too large for your bonsai, can cause soil moisture imbalances, which often lead to root rot. Conversely, underpotting, which involves a pot too small for the tree’s needs, may restrict root growth and deprive your bonsai of necessary nutrients. Both scenarios can jeopardize the well-being of your bonsai.
Preventing Root Shock and Stress
To prevent root shock, it’s critical to provide a stable environment during and after the repotting process. Root shock can significantly set back the development of your bonsai, sometimes resulting in a weakened immune system or, in the worst-case scenario, the death of the tree. Knowing the signs of stress and how to avoid them will bolster the resilience of your bonsai during repotting.
| Mistake | Consequences | Prevention Tips |
|---|---|---|
| Overpotting | Root rot, slow growth | Select a pot proportional to your bonsai’s size |
| Underpotting | Restricted roots, nutrient deficiencies | Ensure adequate space for root expansion |
| Root Shock | Leaf drop, stunted growth | Handle roots gently and maintain consistent soil moisture |
By paying close attention to these guidelines, you can ensure the health and happiness of your bonsai for years to come. Avoiding the common mishaps of bonsai repotting is an investment in the vibrancy and longevity of your living art piece.
Monitoring Bonsai Recovery After Repotting
After lovingly repotting your bonsai, the following weeks are crucial for monitoring your tree’s recovery. Vigilance during this period ensures its health and paves the way for bonsai transplant recovery. We’ll identify the clear signs of successful repotting and determine when you can resume your regular bonsai care routines.
Indicators of Successful Bonsai Transplant
Successful repotting doesn’t just end at soil refill—it’s confirmed by the bonsai’s positive response in the subsequent days. Look for these signs:
- New leaf growth or bud development
- Stability and anchoring of the tree in its new pot
- Roots beginning to colonize the fresh soil mix
- A lack of significant wilting or yellowing of leaves
Monitoring these indicators closely will inform you of the tree’s adaptation and the triumph of your repotting efforts.
When to Resume Normal Bonsai Care Routines
Your bonsai communicates its recovery progress, and understanding its language is key to resuming routine care. Normal watering, sunlight, and feeding schedules can be reintroduced when:
- The signs of successful repotting mentioned above have been consistently observed
- Your bonsai shows no signs of distress over a period of a few weeks
- The root system has had time to heal and grow into its new environment
During this period of bonsai care resumption, maintain a balanced approach—neglect or overzealous care can both set back recovery.
For a visual reminder of the care schedule adjustments, use the following table to track your bonsai’s progress:
| Week Post-Repotting | Care Activity | Observations | Action |
|---|---|---|---|
| 1-2 | Gentle watering | Soil moisture level, leaf health | Adjust water quantity accordingly |
| 3-4 | Monitor for new growth | New buds or leaves, root stability | Continue with minimal disturbances |
| 5+ | Resume fertilization | Signs of active growth, no stress indicators | Reintroduce fertilizers at half-strength |
Adhering to these observations and gradually adjusting your care routine will safeguard your bonsai through its recovery phase. Remember this is a tentative process, and each bonsai may present unique signals due to its species, age, and previous health conditions. Trust your judgment, consult with experts, and your bonsai should thrive in its new container, ready for continued growth and artistry.
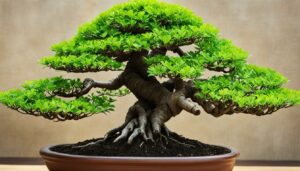
The Art of Potting Bonsai: Aesthetic and Practical Tips
When entering the realm of bonsai potting art, one must consider both the visual appeal and the physiological requirements of these miniature wonders. By harmonizing aesthetic potting tips with practical bonsai potting techniques, you can transform your bonsai into a captivating living sculpture that thrives robustly.
Bonsai aesthetics workshops have long emphasized that the first step in aesthetic potting is selecting a pot that complements your bonsai’s form and color. For example, a pot with subtle hues may enhance the verdant green of your tree’s foliage, and a pot with a wide base can help convey a sense of stability for a windswept style bonsai.
As the bonsai masters often say, the pot is the stage, and the tree is the star of your horticultural theatre. The harmony between them results in a compelling visual dynamic that embodies both stability and movement.
In addition to picking the perfect pot, you should consider the tree’s position in it. This is both an aesthetic choice and a practical one, as the placement affects the visibility of the tree’s surface roots and ensures proper drainage. Case studies on iconic bonsai presentations reveal that often, the tree is slightly off-center, allowing for a more natural, visually appealing composition.
- Consider the pot’s color and glaze in relation to your tree
- Choose a pot size that balances the tree’s volume
- Evaluate the tree’s position within the pot for visual harmony and health
Integrating the principles of visual art as applied to bonsai, take advantage of factors like contrast, balance, and texture. These artistic elements should resonate with the inherent character of your bonsai, accentuating its best features and creating a compelling look that captures the onlooker’s attention.
In conclusion, potting a bonsai is not merely a routine task—it’s an expressive process where aesthetic finesse meets horticultural expertise. By following these guidelines, your bonsai potting efforts can result in a living piece of art that not only captures the eye but also preserves the vitality of your miniature tree for years to come.
Conclusion
As we encapsulate the wisdom shared in this comprehensive guide, your journey to bonsai repotting mastery nears a fruitful milestone. You’ve learned that repotting is a crucial element of bonsai care, demanding precision, understanding, and timing to ensure the vibrant health and aesthetic beauty of your miniature trees. Reflecting on the insights gathered, you now recognize the signs indicating when to embark on this delicate task and the select seasonal windows that offer optimal conditions. This Bonsai repotting summary has armed you with the knowledge of choosing the right pot, preparing your arsenal of tools, and executing a repotting procedure with confidence and care.
Adopting the final tips for bonsai care given here will not only elevate the quality of life for your plant but also enhance your skills as a bonsai enthusiast. The selected soil, the precision in root care, and the meticulous adjustments in watering and fertilization all contribute significantly to a successful repotting. Completing bonsai repotting is not merely about transplanting; it’s about ensuring ongoing vitality through thoughtful observation and tailored care, responding to your bonsai’s unique needs as it acclimates to its new home.
In closing, remember that the art and science of bonsai are lifelong studies, flourishing under the dedicated attention of passionate caretakers. Continue refining your craft, seeking out fresh information, and engaging with the bonsai community to deepen your understanding and appreciation of this exquisite horticultural practice. Your journey doesn’t end here; it’s a continuous path of growth and learning, much like the living art of bonsai itself.
FAQ
What are the signs that my bonsai needs repotting?
Signs your bonsai may need a new pot include roots circling the bottom or poking out of the drainage holes, slow growth, or soil that drains poorly or looks compacted. Other indicators might be a decline in the tree’s overall health, such as yellowing leaves or a lack of vigor.
How often should I repot my bonsai?
The frequency of repotting varies depending on the species, age, and size of your bonsai. Young, fast-growing trees might need repotting every 2-3 years, whereas older, more established bonsai may be repotted every 4-5 years. Always look for the signs that your tree needs repotting instead of adhering to a strict schedule.
When is the best time to repot my bonsai?
The ideal time for repotting bonsai trees tends to be in early spring, just as the tree starts to show signs of new growth. This allows the tree to recover during the growing season. However, the timing can vary based on the specific species and your local climate, so it’s essential to research your particular bonsai type.
How do I choose the right pot for my bonsai?
Selecting the right pot for your bonsai involves considering the size, shape, material, and design that complements your tree’s style. Generally, the pot should be large enough to accommodate the roots comfortably without being too spacious. The style of the pot should also reflect and enhance the bonsai’s overall aesthetic.
What tools do I need for repotting my bonsai?
Essential tools for repotting a bonsai include a pair of bonsai shears, a root rake, a soil scoop, and a wire cutter. Optionally, you may also need a chopstick for untangling roots and helping with soil placement, as well as mesh to cover the drainage holes.
How can I prepare my bonsai for repotting?
Prepare your bonsai for repotting by watering it thoroughly one day before the process, selecting the appropriate soil mix, and having all your tools and the new pot ready. It’s also advisable to protect the area with newspapers or a tarp to catch soil and debris.
How do I repot my bonsai tree safely?
Repotting a bonsai involves gently removing it from its current pot, cleaning excess soil from the roots, and trimming any overgrown or unhealthy roots. Place a new layer of soil in the new pot, position your tree, and slowly add bonsai soil around the roots. Be sure to tamp down gently to ensure there are no air pockets.
What should I consider when choosing bonsai soil?
When selecting bonsai soil, consider a mix that offers proper drainage, aeration, and water retention. The soil mix should also provide the right balance of nutrients. Various components, such as akadama, pumice, and lava rock, are often used in bonsai soil mixes to meet these needs.
How should I care for the roots during repotting?
Take care of the roots by gently untangling them and removing any deceased or overly long roots with sharp shears. After pruning, arrange the remaining roots evenly when placing your bonsai in its new pot. Ensure that they are spread out to encourage healthy growth.
How much should I water my bonsai after repotting it?
After repotting, water your bonsai thoroughly until water runs out of the drainage holes. Be careful not to overwater, as freshly potted bonsai can be more vulnerable to root rot. Adjust watering schedules according to the tree’s needs, which may have changed after repotting.
What fertilization strategies should I use after repotting my bonsai?
Hold off on fertilizing immediately after repotting to avoid burning the fresh roots. Wait for about a month before introducing a balanced fertilizer, and follow the recommended frequency and dosage for your specific bonsai species to promote healthy growth.
What are some common mistakes to avoid during bonsai repotting?
Common mistakes include overpotting (choosing a pot that’s too large), underpotting (a pot that’s too small), rough handling of the roots, not pruning the roots properly, and poor soil selection. To avoid these pitfalls, research your bonsai’s specific needs, handle roots with care, and choose an appropriately sized pot and the right soil mix.
How can I tell if my bonsai is recovering well after repotting?
Signs of a successful bonsai transplant include new growth, such as buds or leaves, and an overall appearance of healthfulness. If repotting occurred in the growing season, you might see active development sooner. Monitor the tree and resume normal care routines when you see positive growth signals.
Can aesthetics play a role in potting bonsai?
Absolutely, aesthetics are vital in bonsai potting. The pot should complement the tree in color, texture, and shape, considering the overall design principles of balance, proportion, and harmony. A pot that aesthetically resonates with your bonsai can greatly enhance its visual appeal.